I love it when my talented friends send me fabulous pictures as proof of our magical lives on the interweb. It makes me feel grounded. BUT – beauty as those pics are, they aren’t always great for printing when it comes times to make postcards or send images to people for printing in their magazines, fancy brochures and/or programs. So this post is about the difference between web images and print images, and how to know that you’re sending the right thing – so YOU will look as good in print as you do on the web.
INFORMATION
About Image Size for Printing:
The internet is great because it gives us access to all kinds of images of ourselves and others, but tragically for the print-minded among us, most of the images found on the internet [like most of what’s on Facebook, or the small images on Flickr] are NOT suitable for printing.
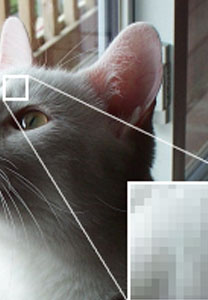
These web-optimized images have been scaled down to contain only 72 “Dots” [also called pixels] of color information Per Inch [eg. “dpi”, also called “resolution”]. Thats perfect for a computer monitor, but for a medium or big pic in a magazine, flyer, brochure, etc, really for any print instance, we need to get images that are 300 dpi or greater — 4 times more dense with color information as web-optimized images! — to look good to our eye when printed on paper, and not blurry and “pixelated”, like when you see something looking all choppy with the little squares in it.
What does that mean and how do you know?
If you have an image file that you want to use for print, but aren’t sure if it’s dpi is correct, open that file in your image editing software [try PC: Paintbrush; Mac: Preview, iPhoto; PC/Mac: Photoshop, GIMP] and look at the image size information, however your program gives you that info*. It will tell you how many actual dots of image data [pixels] are in your image, what the current setting on the image is, and how big that is in inches. You can do some simple math to see how big it would be on a computer versus printed, by dividing the number of pixels by the output method [web or printing].
An example:
A camera phone may take a 600 wide x450 tall pixel picture, which you then copy onto and then open on your computer. *In the program you open it in, there will be a drop-down menu called ‘Tools’ or ‘Edit’. Pick that, and then “Get Info” or “Image Size” and a window will open, telling you lots of info, including that the image is 600×450.
In print terms, that picture is 2in. x 1.5in [600/300 dpi for print=2in; 450/300=1.5in]. Small for a magazine or postcard, probably ok for a brochure. For reference, an image that is 750×600 is about the ‘print size’ of a playing card.
That same picture is in web terms sizes out to be 8.3×6.25 [600/72 dpi for web=8.3; 450/72=6.25, or big enough for a computer screen!].
For printing, we need images that are 300 pixels per inch, cuz that’s what printers print at. For your postcard and magazine needs, try to find/take/get images that are at LEAST 1200×900 or bigger [4×3 inches]. A full page image needs to be 2850×3600 pixels [9.5×12]. A brochure image should be NO smaller than 450×450 [1.5 inches square]. We want to see your brilliant face!
Resizing:
Please DONT “Resize” or “Upsample” options to resize an image from smaller to larger!!!!! That’s how you can guarantee your pic will come out with all the weird little squares when printed.
You can’t just use the “Resample” or “Resize” tool for print purposes, because doing so asks the computer program to make guesses [using math!] to fill in the missing image data from all the pixels that aren’t there, and that’s when you get images that print looking what is called “pixelated”, because you can see the individual edges of pixels. That’s BAD]. That’s why you want large original images to work from.
You can “downsample,” that is, go DOWN in size, because your computer is not missing any image data information, it’s only cutting out the extra. That’s ok. But if someone is asking you for an image for printing, just send them the biggest thing you have. They will downsize as needed.
Oranization
When you send someone who runs a magazine or a conference called, say, Lick The Moist Cherry, a picture or bio, you might be tempted on your computer, to name your picture or bio “Lick The Moist Cherry” — so that you know what it’s for — and email it away. Not only is that awkward, at least 30 other people are naming their images and bios the same thing and sending it to that organizer, who now has 30 Lick The Moist Cherrys, and no time for her own cherry because she has to rename everything that gets sent her.
Do these nice people a favor. Save the image or document as your name, or the name of your troupe, or your presentation title. It will save someone a headache, I promise.
**a note about file extensions. Unless you are a “computer” person, don’t change a .jpg to a .gif or a .doc to a .txt willynilly. Leave it be and it will be better than if you get all cray. Also don’t delete the extension accidentally, they help the other person’s computer know what it’s looking at. If you are a graphics person, you know that .tif or .pdf are preferred delivery formats for print.
Example:
- picture: DamienLuxe_LTMC.jpg [I’ve used an underscore – _ – because it helps Macs and PCs read the filename easier than if you leave spaces]
- bio: DamienLuxe_bioLTMC.txt – [I also anally appended the acronym of the event this bio is for, so I know from my computer what I sent it to.]
CLEAR, DIRECT INSTRUCTIONS
– get your pic onto a computer
– look at the size
– make sure it’s ‘big’ enough for your purposes
– save it with an obvious name [your name_event.xxx]
– email it with an obvious subject line in the email
– sit back satisfied, knowing you did your best
RESOURCES
- GIMP [free image editing software] http://www.gimp.org/
Tutorials and more info on resolution and image sizing:
- http://www.jnevins.com/resolution.htm
- http://www.luminous-landscape.com/tutorials/understanding-series/und_resolution.shtml